Prerequisites
Before you start this tutorial, ensure you have access to a LLM that supports tool-calling features, such as OpenAI, Anthropic, or Google Gemini.1. Install packages
Install the required packages:Sign up for LangSmith to quickly spot issues and improve the performance of your LangGraph projects. LangSmith lets you use trace data to debug, test, and monitor your LLM apps built with LangGraph. For more information on how to get started, see LangSmith docs.
2. Create a StateGraph
Now you can create a basic chatbot using LangGraph. This chatbot will respond directly to user messages.
Start by creating a StateGraph. A StateGraph object defines the structure of our chatbot as a “state machine”. We’ll add nodes to represent the llm and functions our chatbot can call and edges to specify how the bot should transition between these functions.
- Each
nodecan receive the currentStateas input and output an update to the state. - Updates to
messageswill be appended to the existing list rather than overwriting it, thanks to the prebuiltadd_messagesfunction used with theAnnotatedsyntax.
Concept
When defining a graph, the first step is to define its
State. The State includes the graph’s schema and reducer functions that handle state updates. In our example, State is a TypedDict with one key: messages. The add_messages reducer function is used to append new messages to the list instead of overwriting it. Keys without a reducer annotation will overwrite previous values. To learn more about state, reducers, and related concepts, see LangGraph reference docs.3. Add a node
Next, add a “chatbot” node. Nodes represent units of work and are typically regular Python functions.
Let’s first select a chat model:
- OpenAI
- Anthropic
- Azure
- Google Gemini
- AWS Bedrock
chatbot node function takes the current State as input and returns a dictionary containing an updated messages list under the key “messages”. This is the basic pattern for all LangGraph node functions.
The add_messages function in our State will append the LLM’s response messages to whatever messages are already in the state.
4. Add an entry point
Add an entry point to tell the graph where to start its work each time it is run:
5. Add an exit point
Add an exit point to indicate where the graph should finish execution. This is helpful for more complex flows, but even in a simple graph like this, adding an end node improves clarity.
6. Compile the graph
Before running the graph, we’ll need to compile it. We can do so by callingcompile()
on the graph builder. This creates a CompiledStateGraph we can invoke on our state.
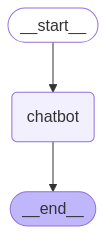
7. Visualize the graph
You can visualize the graph using theget_graph method and one of the “draw” methods, like draw_ascii or draw_png. The draw methods each require additional dependencies.

8. Run the chatbot
Now run the chatbot!You can exit the chat loop at any time by typing
quit, exit, or q.
